Georgia Amphi Restoration

RalphF

Member
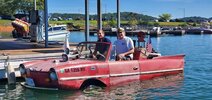
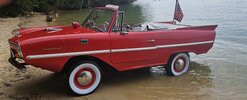
I have Ken Richter's old '65 Amphi. You may have known "Kamikaze Ken". He is doing well and just getting rid of some of his treasures.
I picked it up at the end of May 2020. I figured I would start a thread of some of the things I have been doing to it to prolong its life and give it my personality.
I have been after an Amphicar after seeing one in the late 60's down the street from my home in Marietta Georgia.

I will be adding various posts to this thread as I go...
 

RalphF

Member
After getting caught in a horrible rainstorm a couple of weeks ago, I adjusted my priorities to put getting the convertible top back on ASAP. I have two brand new tops, one tan and one black. I have elected to put the black one on. But first I have to get that top frame in ship shape.

It needed to be sandblasted and painted and of course the right front corner had separated from the piece that goes over the windshield. In trying to find someone to sandblast it and powder coat it, I stumbled across a character who goes by "Crazy Dave". He has a welding shop and makes cool looking lamps, gates and other stuff. He no longer sandblasts but he invited me over to use his gear free of charge and I took him up on it. He taught me to use it and I spent the afternoon cleaning up the frame. After getting it down to the bare metal, he even MIG welded the broken part for me. Wow, the frame operates so easily now that it is rust free.

So today I noticed a little rust forming already and I didn't have time to get it to the paint shop, and besides, I needed to get all that black sealer off the "brow". I spent a couple hours with the wire brush and got all that clean and got the new rust off as well. Tomorrow morning she goes to get powdered black. The shop says they will charge me $50.00.

Here are some photos of what I have done so far.
 

Attachments

  • Before.jpg
    Before.jpg
    1.3 MB · Views: 40
  • In progress.jpg
    In progress.jpg
    772.3 KB · Views: 40
  • top frame ready for powdercoat.jpg
    top frame ready for powdercoat.jpg
    2.2 MB · Views: 38
  • after powder coating.jpg
    after powder coating.jpg
    285.5 KB · Views: 35
Last edited:
Ralph,

Many of us have been where you are now with your top. Looks like you are making good progress!
Keep us posted and keep the pictures coming!

Mark
 

SNOWBIRD

Amphicar Expert
You didn't weld the triangles on like I told you..bottom right in pic.. Now is the time to do it so it won't break again!conv top 003.JPG
 

RalphF

Member
You didn't weld the triangles on like I told you..bottom right in pic.. Now is the time to do it so it won't break again!View attachment 2703
Gord, to be honest I couldn't figure out what you were talking about. I can't remember if you had a photo before, but I even mentioned it to the welder guy and we kept thinking you meant some sort of triangle on the side or in/on the square or U channels. Didn't realize you meant right across the top. I can see it in these pics though. I don't want to heat it all up again, so maybe I will try riveting them on. Should work if it isn't absolutely essential that they be flush. Thanks for trying to teach me though.
 

RalphF

Member
Ralph,

Many of us have been where you are now with your top. Looks like you are making good progress!
Keep us posted and keep the pictures coming!

Mark
Thanks Mark.

I have had some good advice from folks on a lot of this stuff. I do like to blab and post pictures so you will see and hear more. What i find is that people blabbing on this forum are the source of SO much valuable information. I can't believe I finally got a car after all these years. And according to people who know the car and have seen it over the years along with recent pictures, I should have a pretty good one. Hopefully she will be painted this winter.

I really want to do the interior upholstery but the prices have skyrocketed so much since I last checked. I have most of the pieces to do the interior in Red/White but the person who made the door panels made them too thick for the bottom of the door to close. If I can get that licked, then maybe I can do that until I can afford a new interior in Gray/White

After I get the top fabric on the frame (awaiting the front seal/weatherstripping to arrive) I hope to tackle wiring up the pole light and marine light. For some reason Ken ripped all that wiring out, but I have the lights plus 2 spare lenses for the marine light. I also need advice on the windshield wiper motor testing and wiring.

I have sourced some sealed LED beehive lights for the front that appear to NOT LEAK. They almost match the factory ones. They have both parking and turn intensities just like the Hella ones.

Feel free to speak up if you have suggestions.

Ralph
 

RalphF

Member
I have completed repairing the windshield wiper motor and will post what I did, with photos in the main forum section
 
the person who made the door panels made them too thick for the bottom of the door to close.
Hi Ralph,
You could remove the foam from the bottom of the panel under the vinyl. Just open it up, remove the foam or anything else under there holding the door open and get a staple gun and reattach the vinyl.

As for the wiring for the marine light, I went through troubleshooting mine earlier this year. It is interesting how the original set up was done, but a bit confusing compared to regular cars. I had some help figuring it out from Mark Amsdill who lives a few miles from me.
 

Wyofloater

New Member
Thanks Mark.

I have had some good advice from folks on a lot of this stuff. I do like to blab and post pictures so you will see and hear more. What i find is that people blabbing on this forum are the source of SO much valuable information. I can't believe I finally got a car after all these years. And according to people who know the car and have seen it over the years along with recent pictures, I should have a pretty good one. Hopefully she will be painted this winter.

I really want to do the interior upholstery but the prices have skyrocketed so much since I last checked. I have most of the pieces to do the interior in Red/White but the person who made the door panels made them too thick for the bottom of the door to close. If I can get that licked, then maybe I can do that until I can afford a new interior in Gray/White

After I get the top fabric on the frame (awaiting the front seal/weatherstripping to arrive) I hope to tackle wiring up the pole light and marine light. For some reason Ken ripped all that wiring out, but I have the lights plus 2 spare lenses for the marine light. I also need advice on the windshield wiper motor testing and wiring.

I have sourced some sealed LED beehive lights for the front that appear to NOT LEAK. They almost match the factory ones. They have both parking and turn intensities just like the Hella ones.

Feel free to speak up if you have suggestions.

Ralph
Hey Ralph I’m interested in the beehive LEd you found.
 

RalphF

Member
Hey Ralph I’m interested in the beehive LEd you found.
This is the current Ebay listing for them

I was trying to find a picture with them illuminated but couldn't. These 3 pics show the lights though.
They are exact fit as far as the size, the wire opening and the gasket but you do have to drill the 2 small mounting holes because they don't match the factory ones. They have worked great and no leaks.
 

Attachments

  • FB_IMG_1603065955568.jpg
    FB_IMG_1603065955568.jpg
    89.6 KB · Views: 12
  • IMG_20200807_114207.jpg
    IMG_20200807_114207.jpg
    748.2 KB · Views: 12
  • IMG_20200904_155651.jpg
    IMG_20200904_155651.jpg
    1.1 MB · Views: 13

RalphF

Member
Thanks for the hint. I think I am going to go with a new gray and white interior and these panels were red and white.
Yes the marine light wiring was weird. They wanted to make sure that light wasn't ever on unless you were on water and moving (props engaged). I just bypassed that and wired it up like my boat. Although there should be a separate switch for the rear (anchor) light now though.

I'm going to work on preparing for paint this winter I guess though, if I can find a dry warm place to work. My son was supposed to build us a garage in the back but that didn't happen.
 
Right! I was wondering why the dash light would not go off and back light too. Switch under the seat was bad.
The ground came from the front light on the hood as I recall. Very odd, but with safety in mind I guess.
I messed with that for a couple weeks before I got it working again.

Nice pictures! Quite a brass band of horns on your hood there! Bet they are LOUD!
 

RalphF

Member
Right! I was wondering why the dash light would not go off and back light too. Switch under the seat was bad.
The ground came from the front light on the hood as I recall. Very odd, but with safety in mind I guess.
I messed with that for a couple weeks before I got it working again.

Nice pictures! Quite a brass band of horns on your hood there! Bet they are LOUD!
It's a train horn. I think you can hear it a mile or more. There's an air compressor system on board for that and also just inflating tires and blowing water out. I've removed the train horn now and gone back to the original horn. The train horn was on there when I bought the car. I'd love to have the pair of smaller brass horns that the last owner had on there. He took them off when he sold it.
 
Wow!
Next time you are with a camera take a picture or two of the air compressor system. I would like to know how that works.
That may be one of a kind as far as modifications go.
 

RalphF

Member
Oh, it's definitely one of a kind!
I'll take a picture for you I believe it's a compressor system that probably was an accessory for the train horn. It was hooked up to the horn button and works just like a regular horn. It has a circuit breaker on the dash and if you leave it powered up it maintains the pressure all the time so you can hear it repressurizing after you use the horn.

He ran extra piping to one of those air quick disconnects on the dashboard where the choke used to be. You could hook a short hose to that and he had an air chuck and a blow gun in the trunk.

it has an oddball trailer hitch also which I am going to post hopefully later today because I have some questions about how to handle the bumper trim since the trailer hitch is right in the middle of where all the bumper trim goes and not below the car.
 

RalphF

Member
Hi Ralph,
You could remove the foam from the bottom of the panel under the vinyl. Just open it up, remove the foam or anything else under there holding the door open and get a staple gun and reattach the vinyl.

As for the wiring for the marine light, I went through troubleshooting mine earlier this year. It is interesting how the original set up was done, but a bit confusing compared to regular cars. I had some help figuring it out from Mark Amsdill who lives a few miles from me.
Thanks, but it was that the hardboard was too thick. There was no foam. I ended up getting Gord's interior kit.
 

RalphF

Member
Oh, it's definitely one of a kind!
I'll take a picture for you I believe it's a compressor system that probably was an accessory for the train horn. It was hooked up to the horn button and works just like a regular horn. It has a circuit breaker on the dash and if you leave it powered up it maintains the pressure all the time so you can hear it repressurizing after you use the horn.

He ran extra piping to one of those air quick disconnects on the dashboard where the choke used to be. You could hook a short hose to that and he had an air chuck and a blow gun in the trunk.

it has an oddball trailer hitch also which I am going to post hopefully later today because I have some questions about how to handle the bumper trim since the trailer hitch is right in the middle of where all the bumper trim goes and not below the car.
I now have removed the train horn, compressor tank and other accessories. Several have suggested reinstalling it under the muffler. I have the original horn now and also installed two piaa sport horns right behind the license plate for extra safety here in Atlanta traffic. They honk along with the regular one. If I hook them up to an alternating 537 flasher or other circuit, they go dee doo dee dooo like a German Police car or ambulance. I may do that for a novelty. I MAY bring the train horn and other parts to Celina to see if anyone wants them. You can hear it for about 3 miles.
 

RalphF

Member
Car is pretty much finished now. But they are NEVER really finished.
 

Attachments

  • after.jpg
    after.jpg
    168.3 KB · Views: 4
  • before.jpg
    before.jpg
    238.9 KB · Views: 4
Top